Replacing the CPU Module
The following procedure describes how to replace the CPU module.
Power off the device before replacing the CPU module.
|
➢
|
To replace the CPU module: |
|
1.
|
Make sure that you have a new License Key for the new module. If not, ask your AudioCodes sales representative for the License Key. |
|
2.
|
Power down the device by disconnecting the power cord from the power source, and then unplugging the power cord from the power inlet on the Power Supply module. If your device is installed with two Power Supply modules, disconnect both of them from the power source. |
|
3.
|
Remove the faulty CPU module: |
|
a.
|
Remove all cables connected to the ports on the CPU module. |
|
b.
|
Remove the two screws on both sides of the module that secure the module to the chassis, using a Philips screwdriver. |
|
c.
|
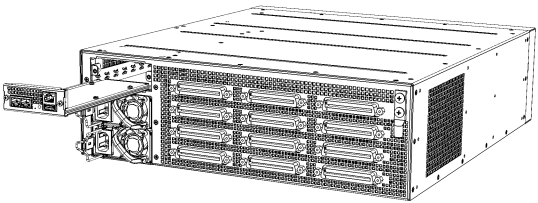
Hold the front part of the module with one hand and place your other hand under the module to support it. Gently pull the module out of the slot, keeping it at a 90-degree angle to the backplane. |
Removing CPU Module
|
4.
|
Install the new CPU module: |
|
a.
|
Hold the front part of the module with one hand and place your other hand under the module to support it. |
|
b.
|
Orientate the module as shown above and align the module with the guiding rails in the chassis slot. |
|
c.
|
Gently slide the module into the slot until it has engaged with the chassis backplane. |
|
d.
|
Secure the module to the chassis, by tightening the two Philips screws on the module. You can use a Phillips or flathead screwdriver. |
|
e.
|
Attach the network cables to the module. |
|
5.
|
Power up the device, by cabling the Power Supply modules to your power source. |
|
6.
|
From your local computer, access the device's Web interface with the device's default IP address (192.168.0.2/24), through any one of the Ethernet ports on the CPU module. |
|
7.
|
Load the software file (.cmp) to the device. If you don't have the file, ask your AudioCodes sales representative for it. |
|
8.
|
Load the License Key file to the device. |
|
9.
|
Load your backup (saved) Configuration Package file or individual files (e.g., ini file, certificate files, Dial Plan file, and CPT file), if you have, to the device. |
|
10.
|
Check that the required certificate is installed on the device (TLS Context). If not, load it. |
|
11.
|
Re-cable the CPU module to your network. |
|
12.
|
Verify that the device is operating correctly (e.g., alarms are cleared and call traffic is being routed) and that it is successfully communicating with third-party equipment (e.g., monitoring system, billing system, or routing system), if relevant. |
|
13.
|
If the device is monitored by OVOC, access the OVOC web-based management interface, remove the device from the OVOC topology, and then re-add it. |